article constraining to a mesh in maya
I’ve recently noticed a few people using follicle nodes on character rigs to constrain an object to a mesh. Which is a solution that works, but with the severe limitation that the animators must be using Maya Unlimited.
An alternative is to use simple Maya render nodes...
-
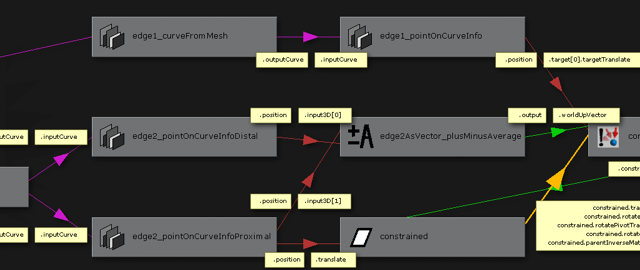
1.Create two curveFromMeshEdge nodes. Connect the .worldMesh attribute from the mesh to each curveFromMeshEdge.inputMesh attributes. These curves will be continuously driven by the mesh edges, and we can use NURBS information nodes to get useful information
-
2.Choose the two edges you want, and set the curveFromMeshEdge.ei[0] to the edge indices. Ideally the edges share a vertex, and are as close to perpendicular as possible
-
3.We’ll use the first curveFromMeshEdge to generate the aim target position. Create a pointOnCurveInfo & connect the .outputCurve from the curveFromMeshEdge to the .inputCurve of the pointOnCurveInfo. Set the pointOnCurveInfo.turnOnPercentage to ON and set the parameter position to either 1 or 0 - whichever gives us the position furthest from the target vertex on the mesh. We can test which point is furthest away by temporarily connecting the .position attribute to a locator
-
4.Create an aimConstraint, and connect the pointOnCurveInfo.position to the aimConstraint’s .target[0].targetTranslate. Our aim constraint is now pointing towards the position on the curve.
-
5.For the other curveFromMeshEdge create two pointOnCurveInfo nodes & connect them up (.outputCurve to .inputCurve). Turn percentage ON for the pointOnCurveInfo nodes, and set one to 0 and the other to 1
-
6.Connect the .position of the pointOnCurveInfo which is outputting the position of the mesh vertex to the translate of the object we want to constrain. Now it’s pinned to the mesh, but not quite oriented
-
7.Create a plusMinusAverage node, and set the operation to Subtract. Connect the .position from the pointOnCurveInfo that is outputting the distal position (furthest from the target vertex) to the input3D[0]. Connect the other pointOnCurveInfo.position to the input3D[1]. Subtracting the vertex position from the other position creates a vector
-
8.Connect this vector to the aim constraint to give us a reliable up vector. The plusMinusAverage.output3D connects to the .worldUpVector of the aim constraint. Set the upVectorType to “vector”
-
9.Connect the aim constraint .constraintRotate to the object to constrain’s rotate
-
10.Finish up by connecting the object to constrain’s .translate to the aim constraint’s .constraintTranslate, .parentInverseMatrix[0] to .constraintParentInverseMatrix, .rotateOrder to .consraintRotateOrder, rotatePivotTranslate to constraintRotateTranslate and .rotatePivot to .constraintRotatePivot
And we’re done. This is all made much easier if implemented as a script. If enough people need this functionality I can look at releasing my scripts online.
Some final notes:
-
‣Comparisons over 1,000 frames with 100 randomly duplicated animated subjects show this method to be just over half as fast as the follicle method. Which on a per-item basis is acceptable, if only a few are required. However demanding applications like attaching feathers to a bird may require the follicle method
-
‣Using a NURBS surface lofted between the two duplicated edges then a normalConstraint is 4 times slower than the follicle due to the slow implementation of the loft node
-
‣The method outlined above constrains the object to a vertex. But we could tweak it to constrain anywhere on a polygon by outputting the position attribute of the two duplicateCurves nodes into a blendColors node, and connecting that blendColors to the object to constrain
Copyright 2010 Jamie McCarter, All Rights Reserved


